
How to Test a Website Manually Before Launch: A Practical QA Walkthrough for Beginners
Learn how manual testers check a website before launch, from preparation and navigation checks to forms, login, search, responsive layouts, browser compatibility and defect reporting, using a practical worked example.
This beginner-friendly QA walkthrough explains how to test a website manually before it goes live. Using a fictional online bookstore, it covers what to prepare, a ten-step testing process, eight practical scenarios, responsive and browser checks, and a sample defect report. It also shows how students can practise without industry experience and which skills help them become job-ready manual testers.
A website can look finished and still fail in the first five minutes of real use. A contact form that never sends, a menu that disappears on a small phone, a login page that accepts a wrong password: none of these show up in a design review. They show up when someone uses the site the way a visitor would.
That is the purpose of manual website testing. A tester works through the site by hand, compares what happens with what was agreed, and reports every difference before real visitors find it. Teams that also run automated checks still depend on a person to judge whether a page is clear, usable and correct.
This walkthrough follows one fictional example, an online bookstore called PageTurn, from requirement review to the final pre-release check. You will see what to prepare, which areas to test and in what order, how to write a defect report, and how to practise without a job. If you want structured practice alongside this article, Cinute Digital (CDPL) teaches these skills in its manual testing course.
What Does Manual Website Testing Involve?
Manual website testing is the process of checking a website by hand, without automation scripts, to confirm that it works as required, displays correctly and is usable on the browsers and devices its visitors use.
Before launch, the tester is answering one question: is this site ready for real visitors? To answer it, the tester checks four things:
- Function: does every feature do what the requirement says?
- Content: are texts, images, prices and links correct?
- Layout: does each page adapt to different screen sizes?
- Behaviour under error: what happens when a visitor enters bad data or something fails?
Most of this work is black box testing. You test from the visitor’s side by giving inputs and observing outputs, without reading the source code. For the wider picture of test types and levels, CDPL’s software testing guide is a good companion. This article stays on one task: getting a website through its final check.
What Should You Prepare Before You Start Website Testing?
Before you run a single check, confirm six things: requirements, test environment, browsers and devices, test data, user roles and scope. Skipping this step is a common reason
Acceptance criteria are the conditions a feature must meet to be accepted. In sprint-based teams they arrive with each user story, which is why it helps to understand how manual testing fits into an agile workflow. If a requirement is vague, ask for clarification now. A defect found later because nobody asked is expensive for everyone.
Always test on staging, never on the live site, and never use real payment details. Write down the build version too, because a defect is only useful if the developer can tell which version showed it.
Step-by-Step Manual Website Testing Process
Work in a fixed order so that nothing is skipped and every defect can be traced to a step. The ten steps below move from understanding the site to reporting and retesting.
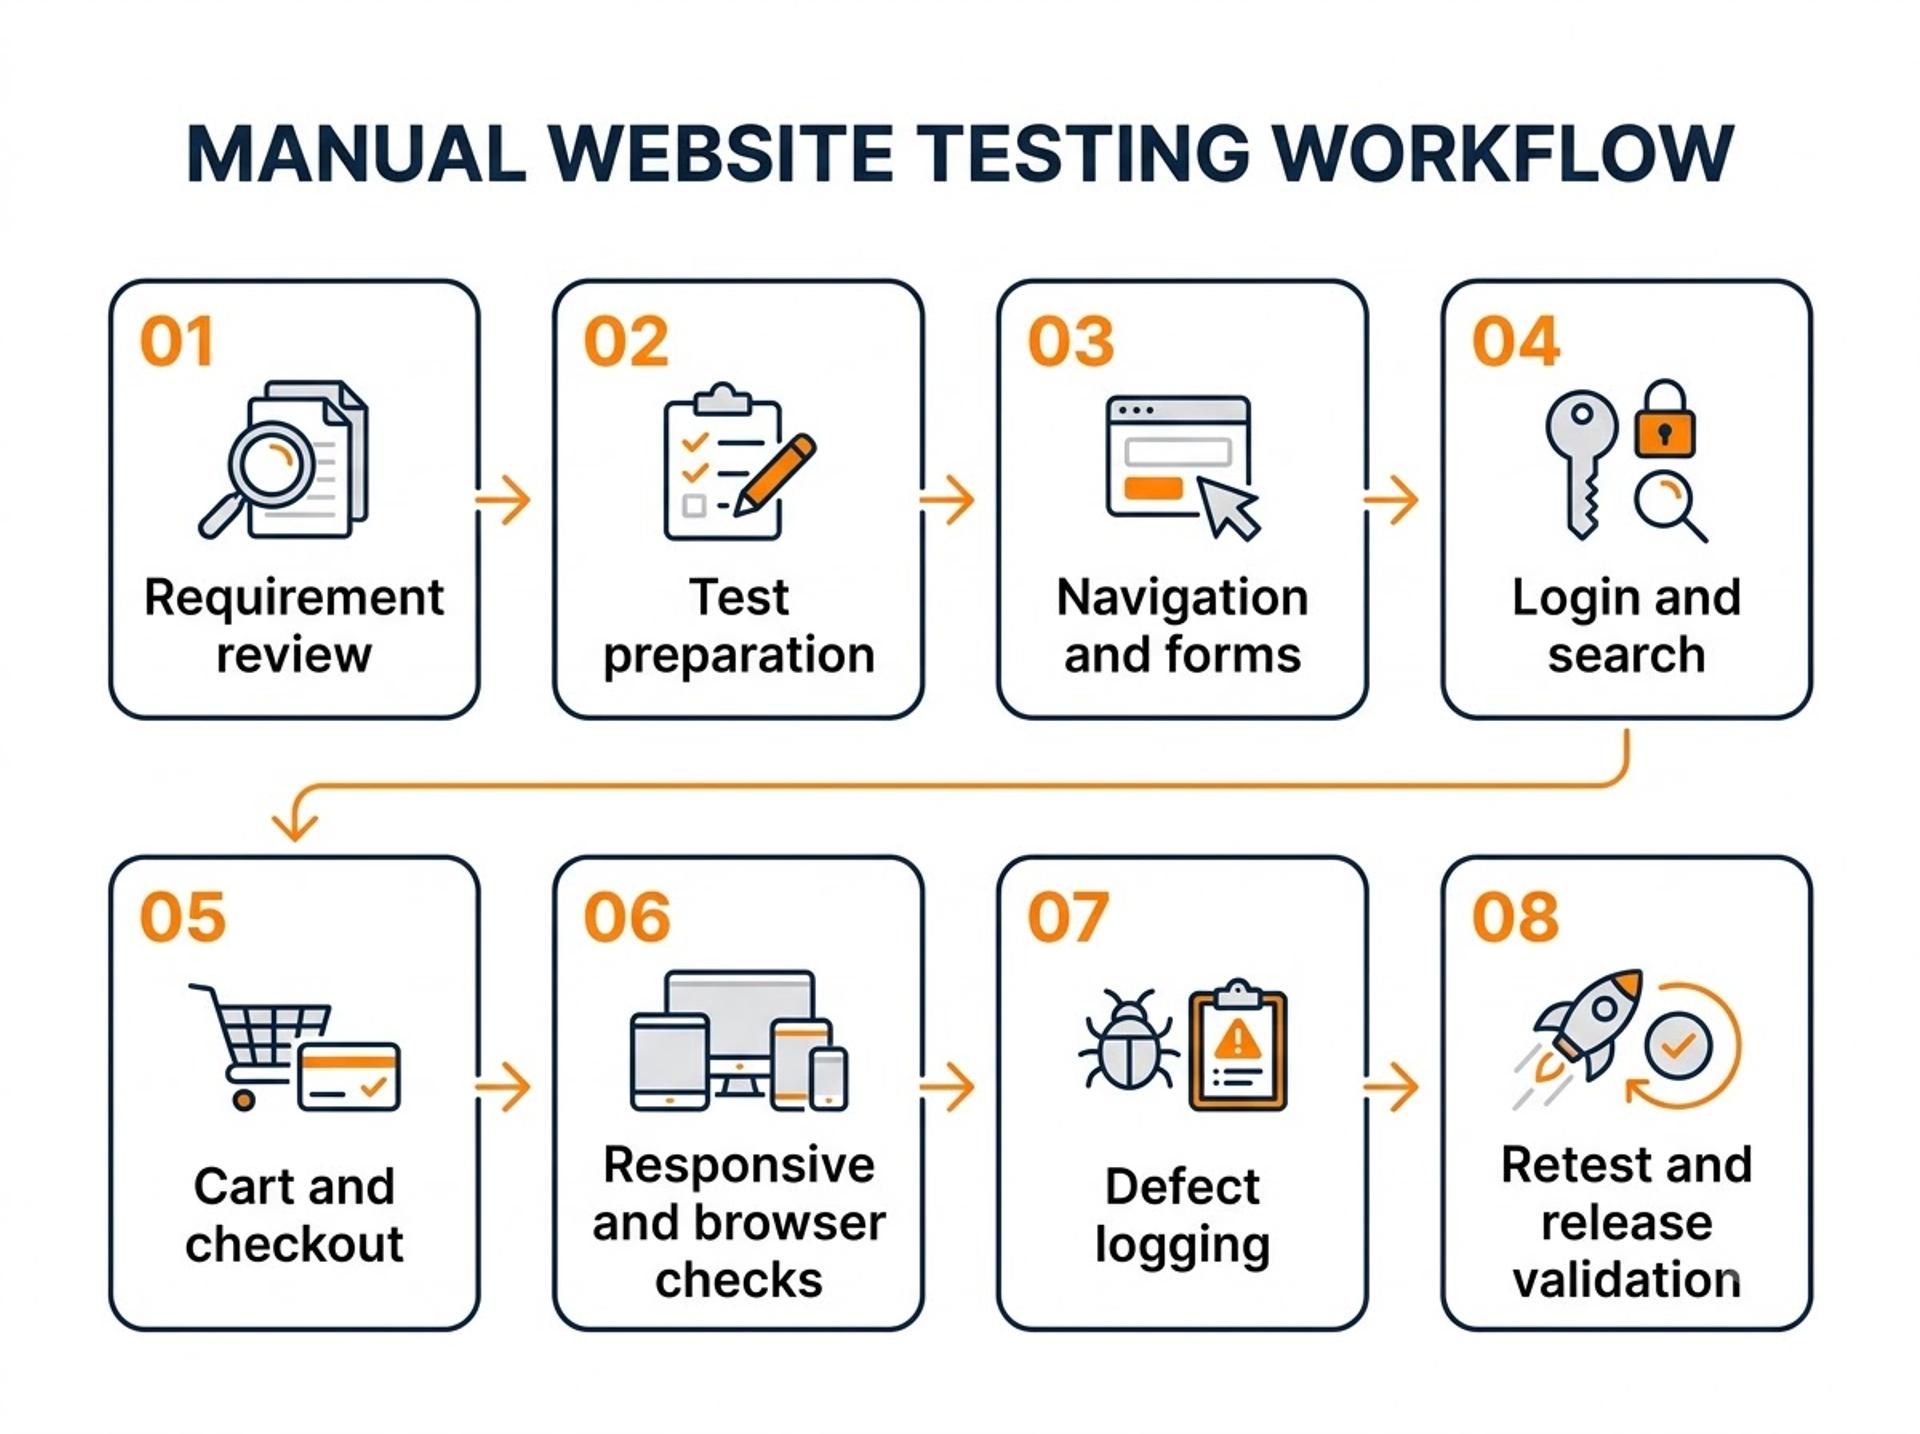
Step 1: Understand the requirements
Read the requirement document, user stories or design pages. List each feature and its expected behaviour, and mark anything unclear. PageTurn’s list might include registration, login, book search, cart, checkout and a contact form.
Step 2: Review navigation and page structure
Click every item in the main menu, footer and logo. Check that each link opens the right page, that page titles and headings make sense, and that the browser’s Back button behaves normally. Open a non-existent address on purpose to see whether the site shows a helpful error page instead of a blank screen.
Step 3: Check forms and user inputs
Test each field with valid data, empty required fields, too-long text, wrong formats and special characters. Confirm that a success message appears only when the submission really worked. For important forms, also check that the data was stored. Testers often do this with a few basic queries, as shown in CDPL’s guide to SQL for testers.
Step 4: Validate login and registration
Register a new account, log in, log out, then repeat with wrong passwords, unregistered emails and blank fields. Check that the password field hides characters and that error messages are clear without revealing more than they should. Also confirm that a logged-out visitor cannot reach account pages by pasting the address into the browser.
Step 5: Test search and filtering
Search for an exact title, a partial title, a title in different capital letters, and a term that does not exist. Apply filters one at a time and then together. Check that result counts, sorting and the “No results” message are correct.
Step 6: Check cart and checkout, where relevant
Add an item, change the quantity, remove it and add it again. Verify that prices and totals update correctly, then run the payment flow in test mode, including a failed payment. This is a complete user journey, so it also benefits from the approach in CDPL’s article on end-to-end testing strategies.
Step 7: Review responsive layouts
Resize the browser window and view the site on at least one real phone. Look for overlapping text, cut-off buttons, images that overflow and menus that cannot be opened. The next sections explain this in more detail.
Step 8: Check browser compatibility
Repeat your key journeys (login, search, checkout) in each browser on the agreed list. A feature that works in one browser can fail in another because browsers do not always read the same code in exactly the same way.
Step 9: Validate error messages and edge cases
Edge cases are unusual but possible situations: a very long name, an emoji in a text field, a double click on the Submit button, or a lost internet connection during payment. Error messages should be clear, correctly spelled and helpful. If a form fails with no visible message, the cause may be in the request behind it. Learning to read server responses, for example through API testing in Postman, helps you describe the problem precisely.
Step 10: Record defects and retest fixes
Report each failure with enough detail for a developer to reproduce it. When a fix is delivered, repeat the original steps, then quickly check nearby features that the change could have affected. A fix that breaks something else is a common finding.
Practical Website Testing Scenarios Every Beginner Should Understand
The table below shows eight common scenarios on the PageTurn site. For each one, you can see what the tester does, what they should observe and what would count as a defect. Treat it as a starting point for your own checklist, not a complete test suite.
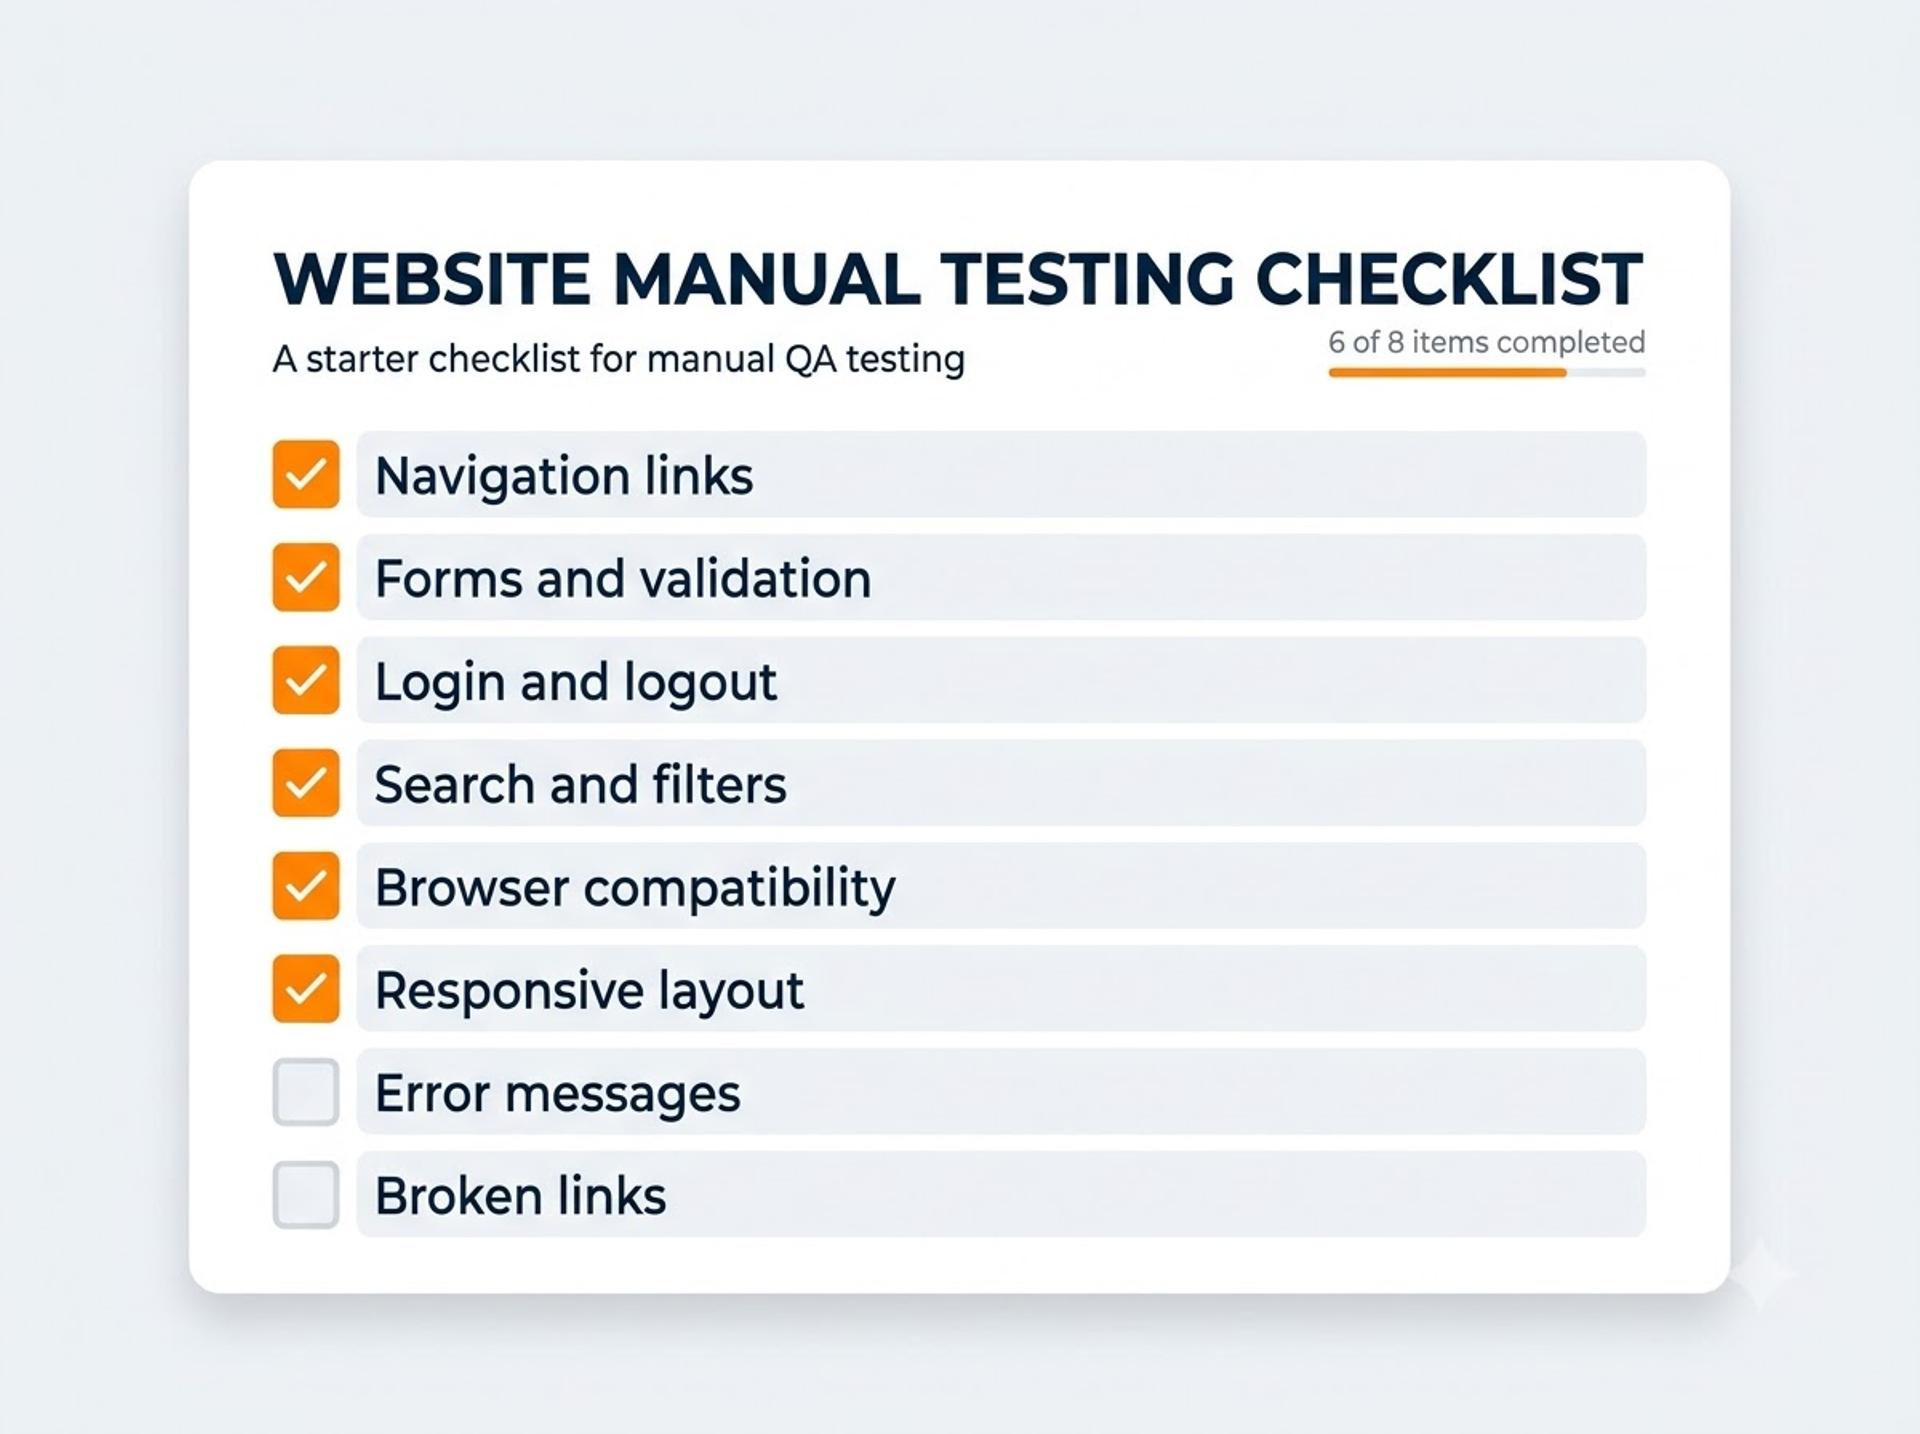
After the scenarios above, spend 20 to 30 minutes on an unscripted pass. This is exploratory testing: you move through the site like a curious visitor, follow your instincts and note anything that feels wrong. Many real defects are found this way because no checklist can predict every path.
How to Check Responsive Layouts and Browser Compatibility
Responsive testing checks that a page adapts to different screen sizes. Compatibility testing checks that it works across the browsers and operating systems your visitors use. Do both on the journeys that matter most, not on every single page.
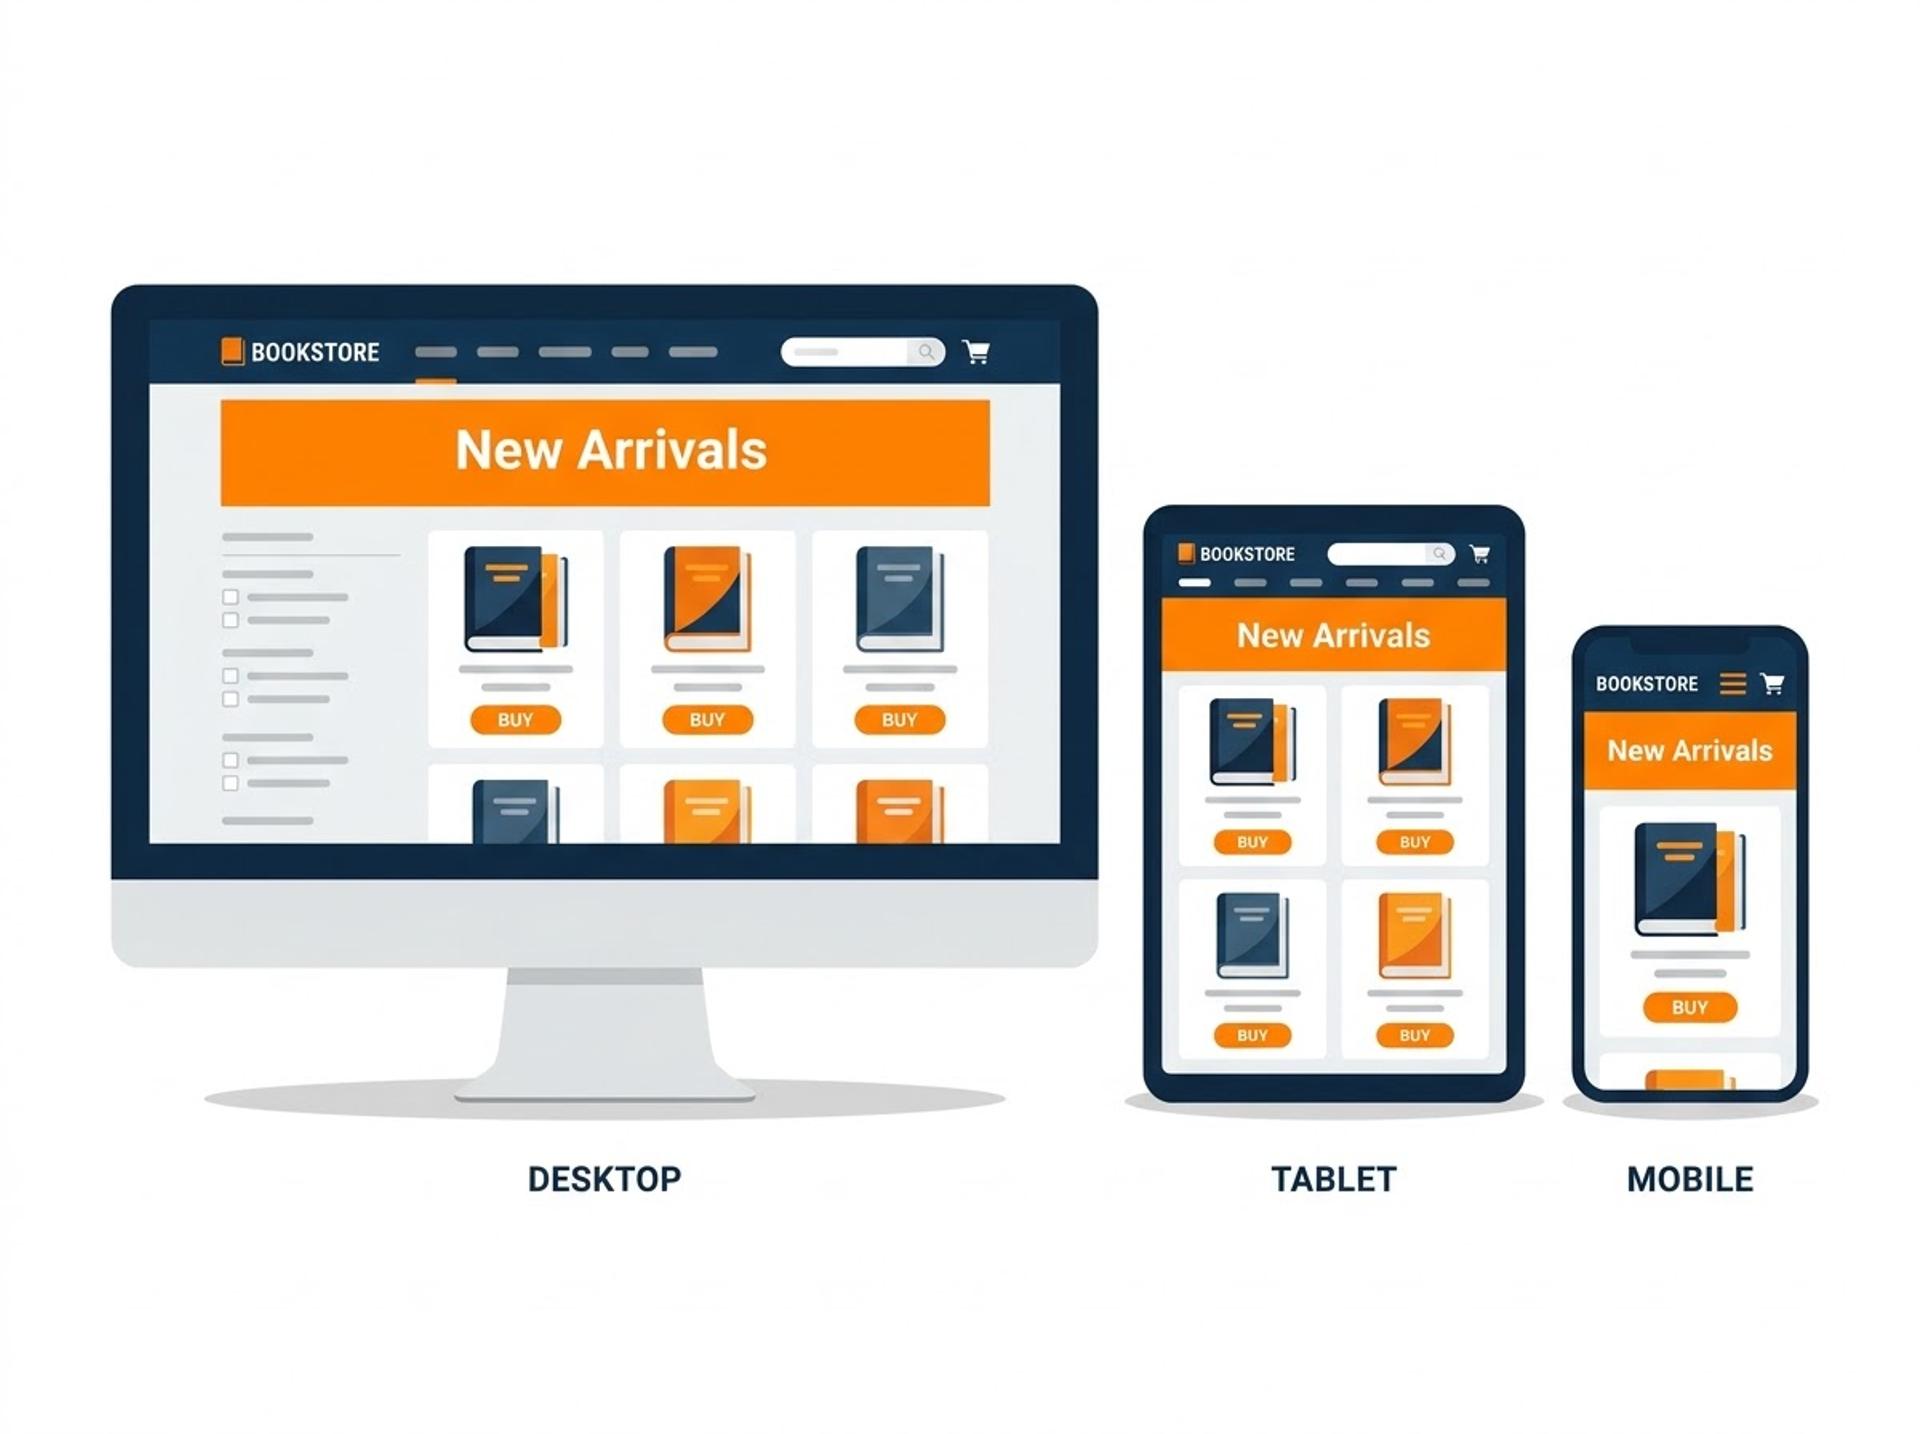
A quick way to start is your browser’s built-in device mode. Chrome’s DevTools device mode lets you preview different screen sizes without owning every phone. It is useful for layout, but it is a simulation, so confirm important pages on at least one real phone and one tablet.
When you test, look for:
- Text that is cut off, overlapping or too small to read
- Buttons that are too small to tap, or too close together
- Sideways scrolling on a phone
- Images or tables that spill outside the screen
- Forms where the on-screen keyboard hides the field being typed
- Features that work in one browser but not in another
Choose browsers based on who will use the site, not on personal preference. If analytics from an earlier version of the site exist, use them. Otherwise, agree the list with the project team. Mozilla’s MDN Web Docs has a helpful introduction to cross-browser testing that explains common causes of browser differences. In every defect report, record the browser name, version and operating system, because the problem may not appear anywhere else.
How to Identify and Document Website Defects
A good defect report lets a developer reproduce the problem without asking you a single question. Include these details every time:
- Title: a short statement of what is wrong and where
- Environment: site address, build version, browser, operating system and device
- Preconditions: what must be true before the steps begin
- Steps to reproduce: numbered, in the exact order you performed them
- Expected result: what should happen according to the requirement
- Actual result: what really happened
- Severity and priority: how serious the problem is and how soon it should be fixed
- Evidence: a screenshot or short screen recording with the problem visible
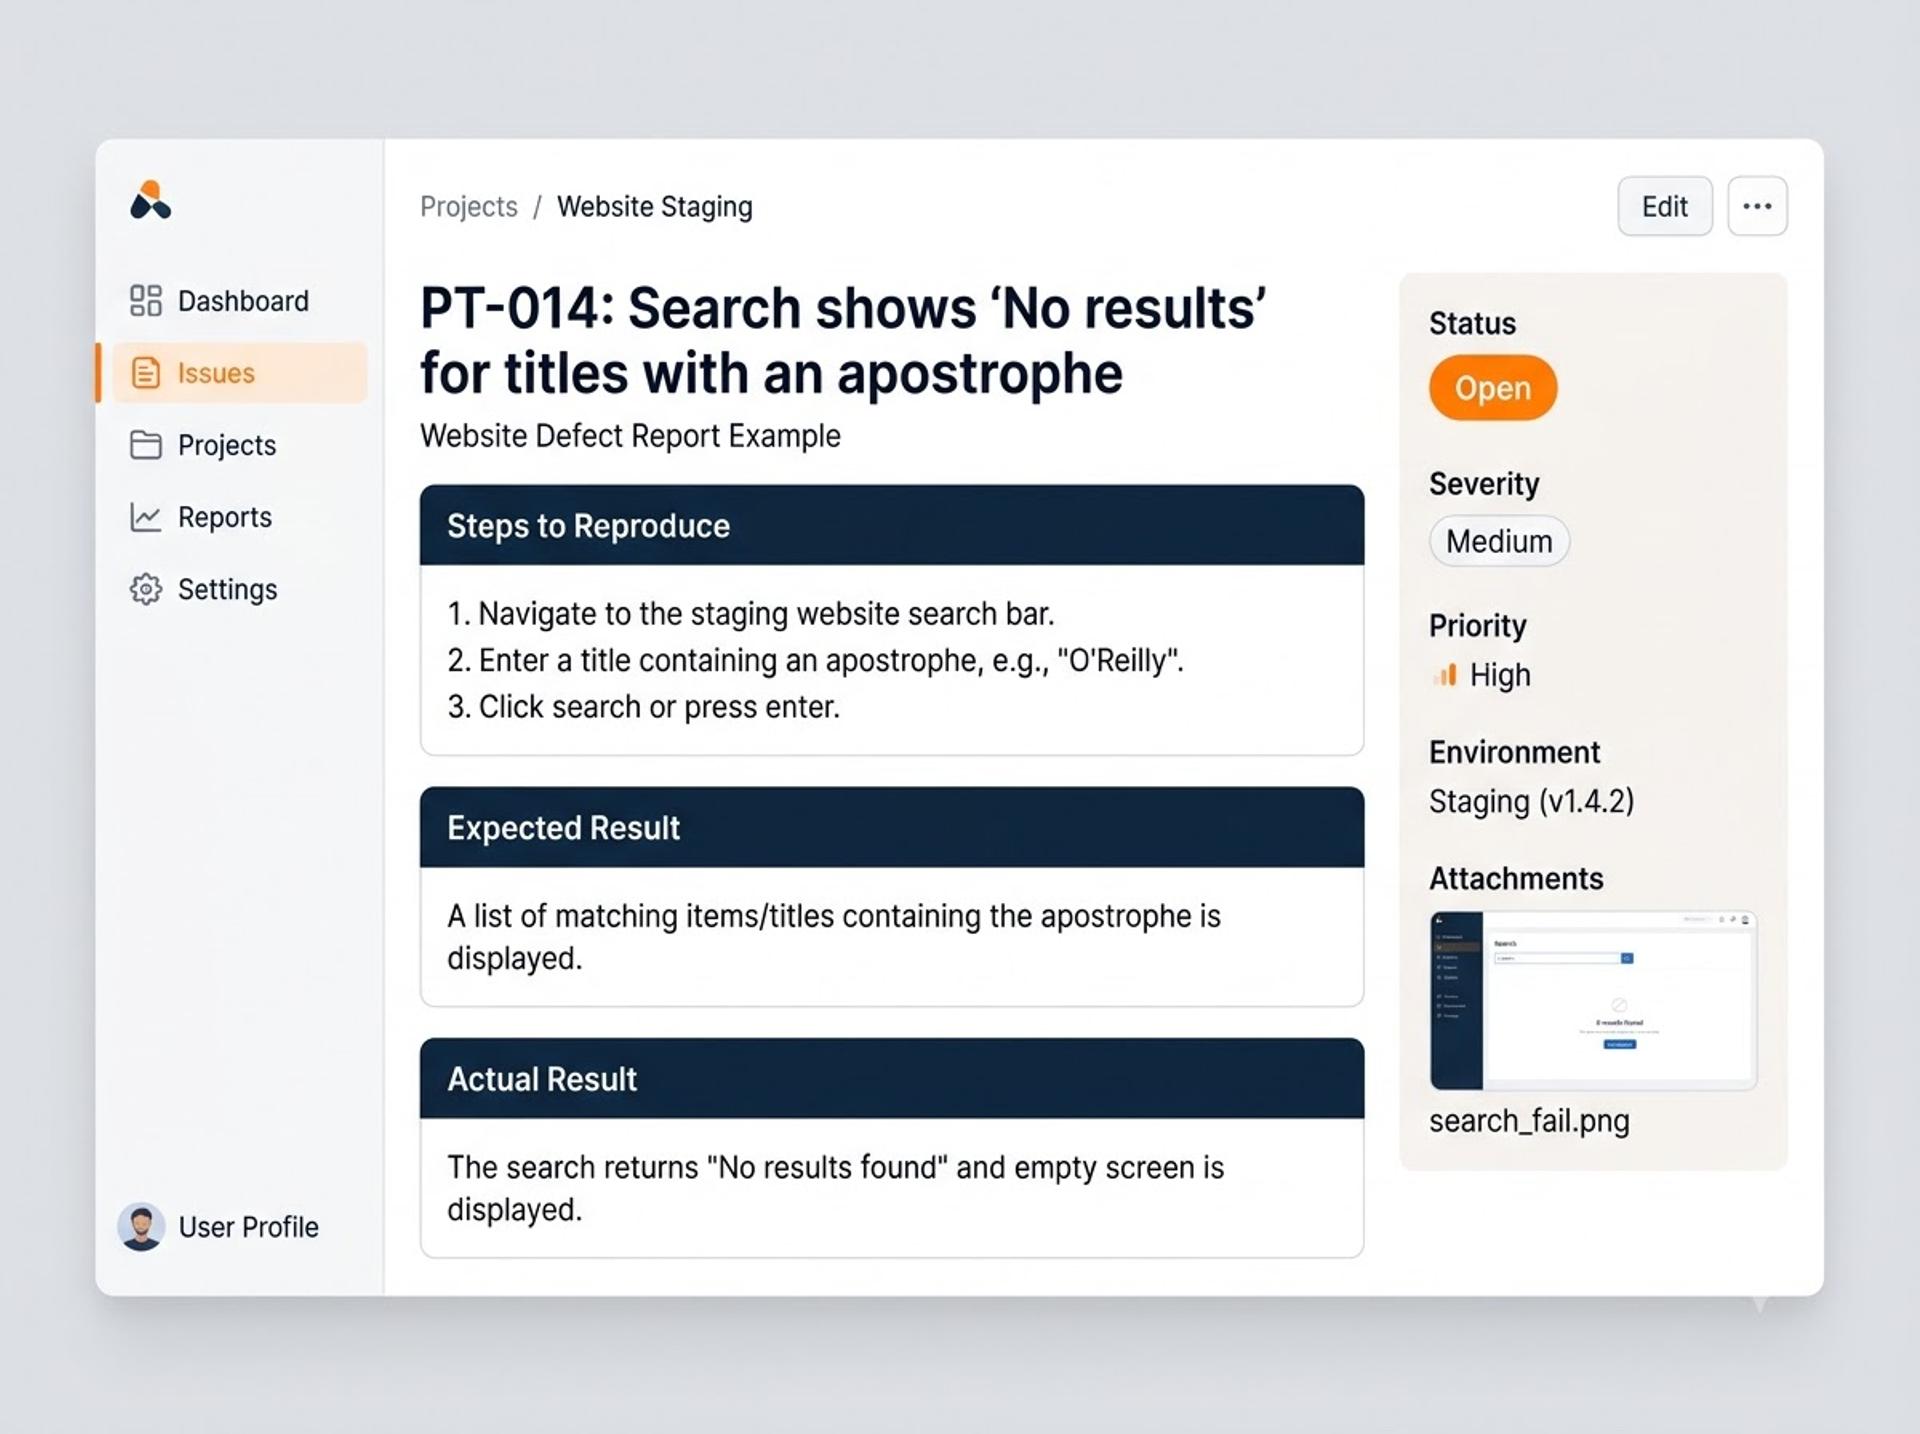
Here is an original example from PageTurn. It is illustrative and not taken from a real project.
Notice that severity and priority are different. Severity describes the impact on the user. Priority describes how soon the team should fix it. CDPL’s defect reporting and tracking guide explains the bug life cycle and how teams manage these fields.
Common Website Testing Mistakes Beginners Should Avoid
- Testing only the happy path. Valid input proves very little. Add empty, wrong and extreme inputs to every form.
- Using one browser and one screen. Pick at least two browsers and one real phone.
- Testing on the live site. Use staging and test accounts so real customers and orders are never affected.
- Writing vague defects. “Login not working” helps nobody. State the account used, the steps and what you saw.
- Forgetting environment details. Build version, browser and device belong in every report.
- Skipping the retest. Confirm each fix, then check the features around it.
- Testing with stale data. Old cookies or cached pages can hide or invent problems. Use a private window when you need a clean session.
- Guessing instead of asking. If expected behaviour is unclear, ask the product owner or developer rather than assuming.
How to Practise Website Manual Testing Without Industry Experience
You do not need a job to build testing experience. You need a site, a method and a record of your work.
- Choose a safe site. Use a small website you built, a friend’s project you have permission to test, or a practice site made for testers. Do not run aggressive or security-style tests on a live business site you do not own.
- Write a short checklist. Start with navigation, forms, login, search, responsive layout and two browsers. A simple spreadsheet is enough.
- Follow real user journeys. Walk through what a first-time visitor, a returning customer and an admin would do.
- Record observations as you go. Note what you tested, what you expected and what you saw, including the things that worked.
- Document defects properly. Use the report format shown above, with screenshots.
- Retest corrected issues. If you are testing your own project, fix a defect and confirm the fix.
- Build a small portfolio. Keep one folder with your checklist, a handful of clear defect reports and a one-page summary of what you tested and what you found.
A portfolio like this gives an interviewer something concrete to discuss, which is more useful than a list of tool names.
Skills That Help Beginners Become Job-Ready Manual Testers
Tools can be learned in a few weeks. These habits take longer, so start building them early:
- Observation: noticing small differences in text, spacing, behaviour and timing
- Clear writing: describing a problem so that someone else can reproduce it
- Questioning requirements: asking what should happen before deciding that something is wrong
- Basic web knowledge: understanding web addresses, how browsers behave and how to open developer tools to read error messages
- Test design thinking: choosing a few inputs that represent many, such as boundary values and invalid formats
- Prioritisation: testing high-risk features first when time is short
- Working with developers: reporting problems factually, without blame, and discussing them calmly
Common testing vocabulary, including test environment, test data and defect, is also used in the ISTQB Foundation Level material, so it is worth learning these terms properly. You can read about the certification on the ISTQB website.
Final Thoughts
Manual website testing is learned by doing. Reading about login checks is useful, but finding a real defect, writing it up clearly and confirming the fix teaches far more. Start with a small site, follow the ten steps and keep your records.
If you want a structured path, Cinute Digital’s Manual Testing Course is a relevant next step. Whichever route you choose, keep testing real websites and keep your evidence.
Frequently Asked Questions
Can a beginner test a website manually?
Yes. Manual website testing needs careful observation, a checklist and clear reporting, not programming. A beginner can start with navigation, forms and login on a small site.
What should be checked during website manual testing?
Navigation and links, forms and validation, login and registration, search and filters, cart and checkout where present, responsive layout, browser compatibility, error messages and content accuracy.
How do manual testers test a website before launch?
They prepare requirements, a staging environment, test data and a browser and device list. Then they run checks in a planned order, record defects with steps and evidence, and retest fixes before the release decision.
Which browsers should be considered during website testing?
The ones your visitors actually use. This usually means current versions of Chrome, Edge, Firefox and Safari, plus mobile browsers on Android and iOS. Adjust the list using analytics or project requirements.
Is coding necessary for manual website testing?
No. A basic understanding of how websites work helps, and skills such as SQL or API testing add value later, but manual testing can be started without programming.
How can students practise manual testing at home?
Pick a small site you have permission to test, write a short checklist, test the main journeys in two browsers and one phone, document defects clearly and keep the results in a portfolio.
What is the difference between website testing and web application testing?
A website mainly presents content, so testing focuses on content, links, layout and simple forms. A web application has accounts, stored data and business rules, so testing also covers user roles, data handling and workflows. Many real sites are a mix of both, and the same techniques apply.
How can I learn practical manual testing skills?
Combine learning with practice: study the core concepts, test real websites and write defect reports. A structured programme, such as Cinute Digital’s Manual Testing Course, can provide guidance and feedback.
Tags

A Manual Tester in TESTRIQ QA LLP and also as Corporate Trainer with CDPL. With a focused career in training and development.