
Model Deployment with Flask: A Complete Beginner's Guide
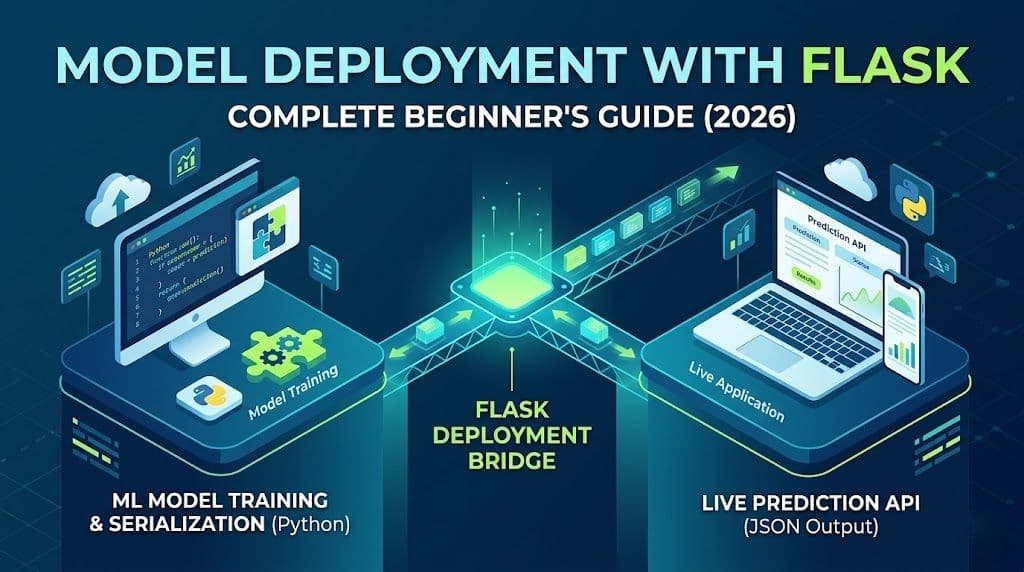
Bridge the gap between model training and real-world applications. This complete beginner's guide covers everything you need to successfully deploy your machine learning models using Python and Flask.
Learn step-by-step model deployment with Flask. Discover how to turn your trained machine learning models into real-world REST APIs with our complete beginner's guide.
Have you ever trained a machine learning model that achieved 99% accuracy on your Jupyter Notebook, only to wonder, "What do I do with this now?" You are not alone. Thousands of students and aspiring Python developers successfully train predictive models but struggle to share them with the world.
A model sitting in a notebook is just an experiment. To make it useful whether for a mobile app, a web dashboard, or a business system you must deploy it. This is where model deployment with Flask comes in.
In this comprehensive guide, we will explore exactly what model deployment means, why machine learning models need to be deployed, and how you can use Flask to turn your Python machine learning model into a fully functional API. By the end of this tutorial, you will know how to bridge the gap between model training and real-world software applications.
What Is Model Deployment?
Model deployment is the process of taking a trained machine learning model and making it available to other applications or users so they can use it to make predictions.
Training vs. Deployment
When you are learning understanding what data science is, you typically focus on the training phase: cleaning data, engineering features, and teaching an algorithm to recognize patterns.
Deployment is the next phase. It happens when you take that finalized, "smart" model and host it on a server. Instead of running a local script, users (or other software systems) can send new, unseen data to the model over the internet and receive a prediction back instantly.
A Real-World Example
Imagine you are an AI/ML learner who just built a house-price prediction model. In your notebook, you type in the number of bedrooms and the model prints out a predicted price of $250,000.
If you want real estate agents to use your model from their smartphones, they cannot run your Python notebook. Instead, you deploy your model as a web service. The agent's mobile app sends the house details to your service, your model calculates the price, and the service sends the $250,000 prediction back to the app.

What Is Flask?
Flask is a lightweight, beginner-friendly web framework written in Python. A framework provides the basic foundation and tools needed to build web applications and Application Programming Interfaces (APIs).
Why Beginners Love Flask
- Micro-framework: Unlike heavier frameworks (like Django), Flask does not force a specific folder structure or require you to use built-in databases. It gives you only what you need to get a web server running.
- Python-Native: Because it is written in Python, it integrates seamlessly with data science tools.
- Easy APIs: Flask makes it incredibly simple to create a REST API a bridge that allows different software applications to talk to each other over the internet.
While a traditional web application returns HTML pages for a user to look at, an API built with Flask returns raw data (usually in JSON format) that other programs can process.
Why Use Flask for Machine Learning Model Deployment?
If you are stepping into a comprehensive data science full course, you will quickly notice that Flask is the industry standard for learning deployment. But why?
- Python Compatibility: Machine learning models are heavily reliant on Python libraries like scikit-learn, pandas, and NumPy. Flask allows you to keep your entire backend in Python.
- Lightweight Architecture: Flask requires very little code to get a server running, making it perfect for deploying ML models without unnecessary bloat.
- Simple Learning Curve: For freshers and students, Flask's straightforward syntax means you spend less time learning web development and more time focusing on your machine learning logic.
- Fast Prototyping: You can build and test a Flask API for machine learning in under 50 lines of code.
Note: While Flask is excellent for educational purposes, prototyping, and small-to-medium applications, it is not always the default choice for massive, enterprise-level production workloads (we will discuss this later).
How Flask Model Deployment Works
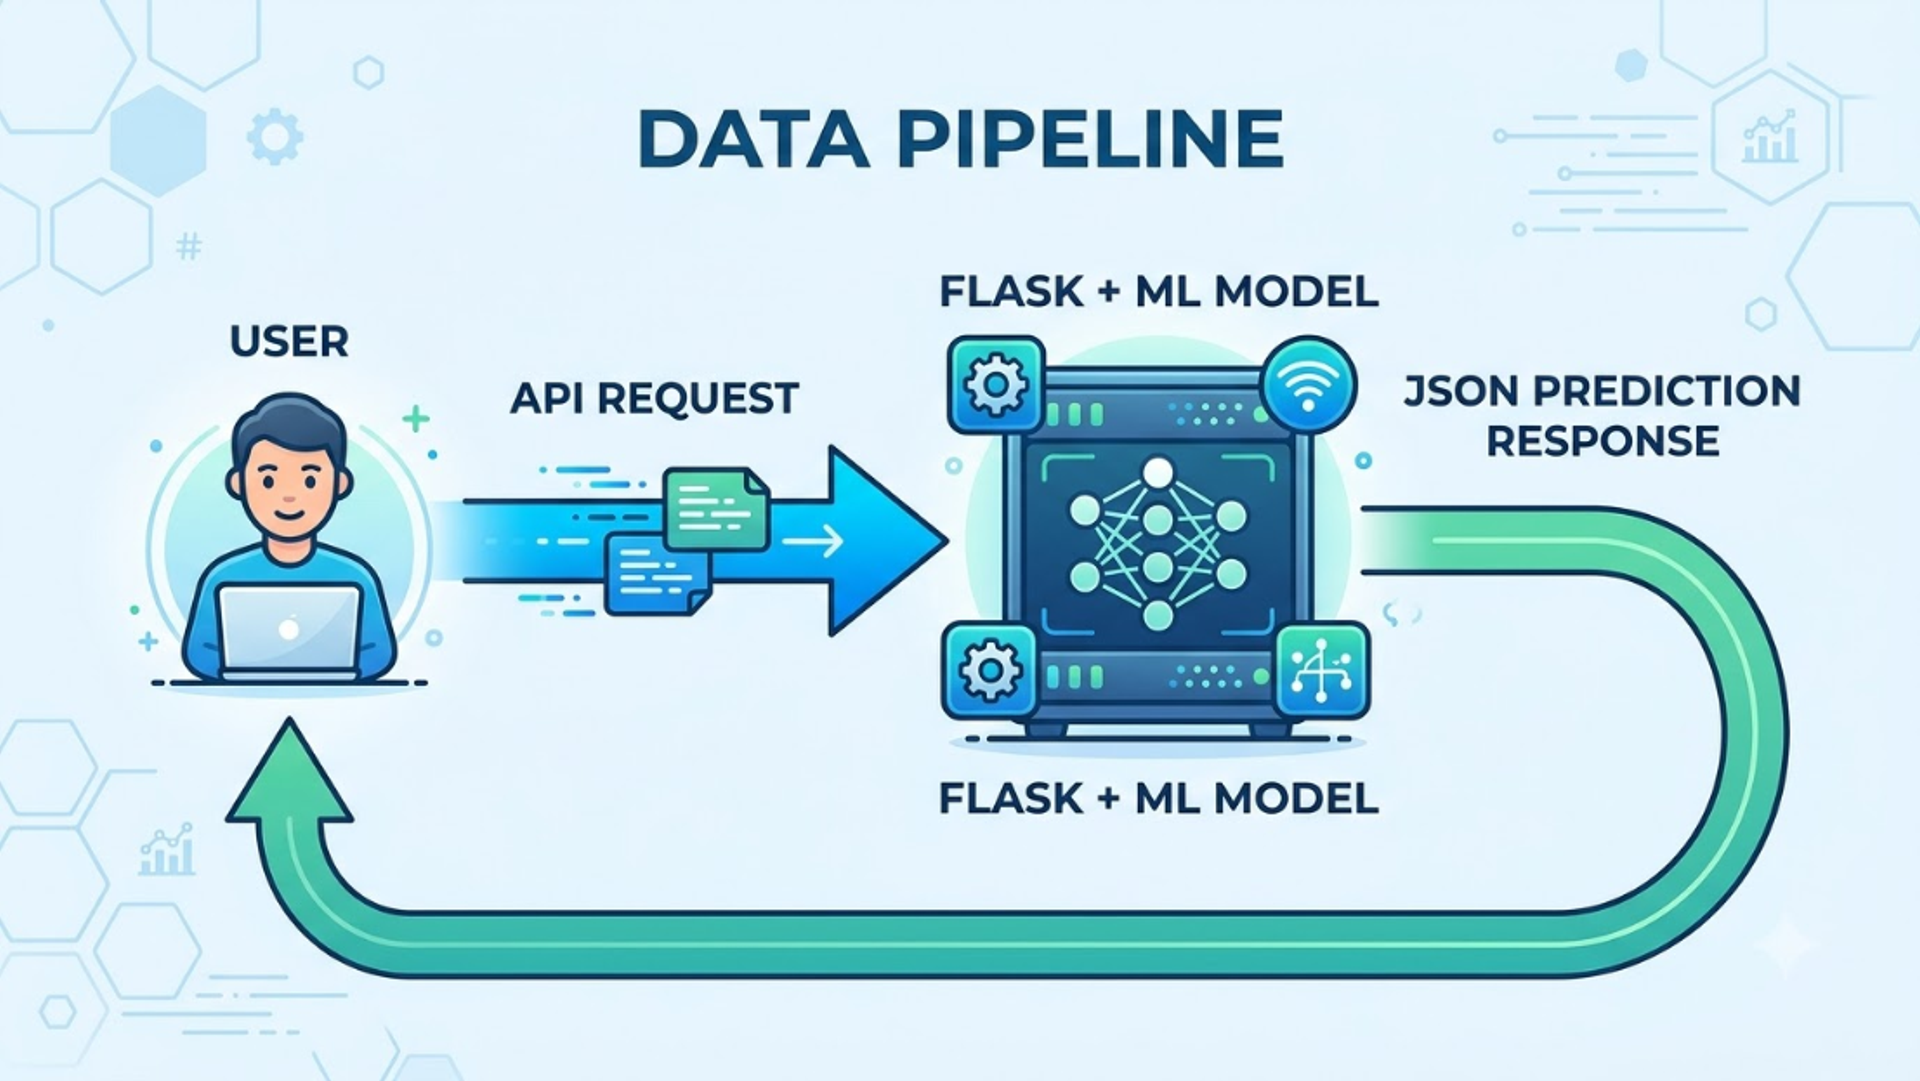
When you deploy a machine learning model using Flask, you create a communication pipeline. Here is the step-by-step workflow:
- User/App (Client): A user submits input data (e.g., house size = 1500 sq ft, bedrooms = 3).
- API Request: The application packages this data into an HTTP POST request and sends it to your Flask server.
- Flask Server: Flask receives the incoming request and extracts the data.
- Preprocessing: Your Python code formats the data so the model can understand it (e.g., converting text to numbers).
- ML Model: The pre-loaded, trained model processes the input data and generates a prediction.
- JSON Response: Flask takes the prediction, converts it into a JSON format, and sends it back to the user over the internet.
Prerequisites for Model Deployment with Flask
Before diving into the code, you should be comfortable with:
- Basic Python: Functions, dictionaries, and virtual environments. (If you need a refresher, consider a Python programming mastery guide).
- Machine Learning Fundamentals: How to train a basic scikit-learn model.
- JSON (JavaScript Object Notation): The standard text format used to send data back and forth on the web.
- Basic Command-Line Usage: Navigating folders and running scripts in your terminal.
Required Tools/Libraries: Python, Flask, scikit-learn, joblib (or pickle), and a tool to test APIs like Postman or your web browser.
Step-by-Step Model Deployment with Flask
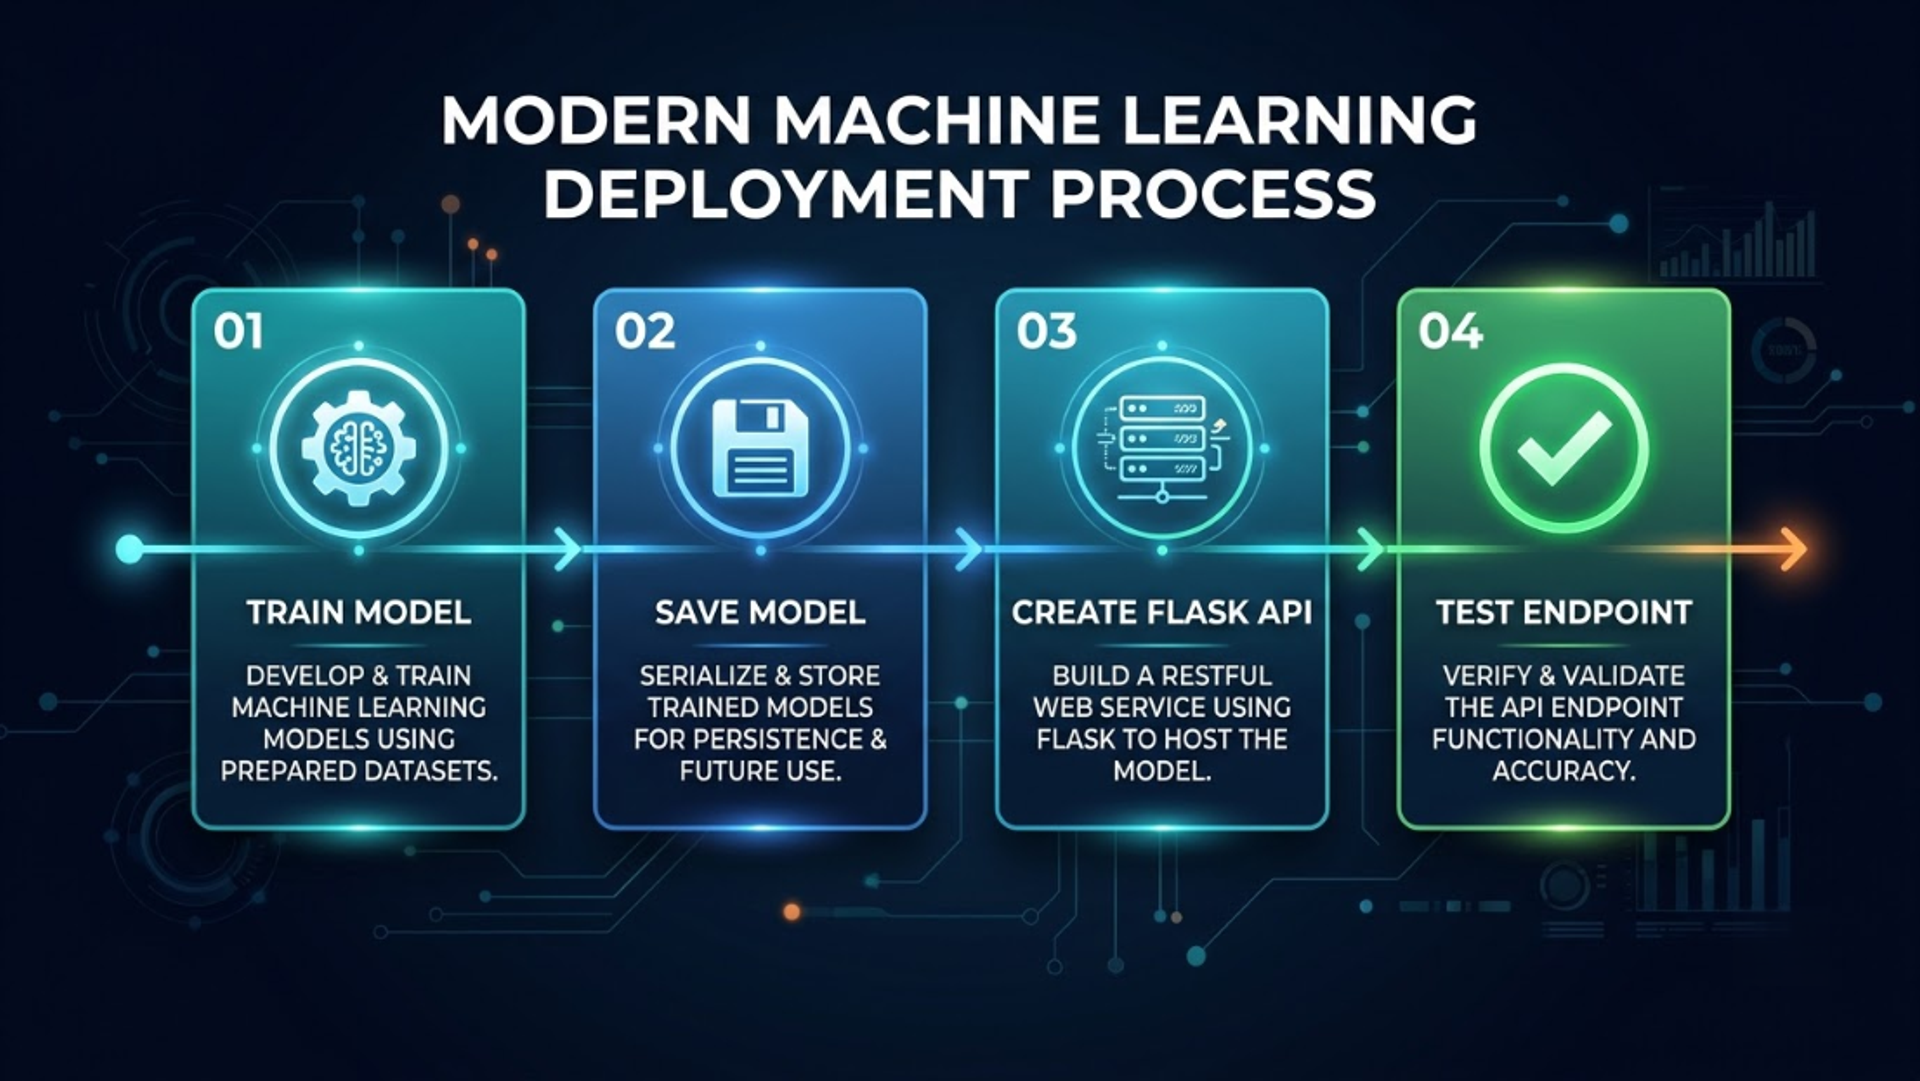
Let’s walk through a practical, beginner-friendly tutorial to deploy ML model using Flask. We will use a highly simplified house price prediction model.
Step 1 - Train a Machine Learning Model
First, we need a trained model. Create a file named train_model.py and run this simple scikit-learn Linear Regression example.
Step 2 - Save the Trained Model
Notice the joblib.dump() line above? When training finishes, the model only exists in your computer's temporary memory (RAM). If you close Python, the model is deleted.
By saving the model using joblib or pickle, we serialize it into a .pkl file. This allows Flask to load the exact same trained model later without having to retrain it from scratch.
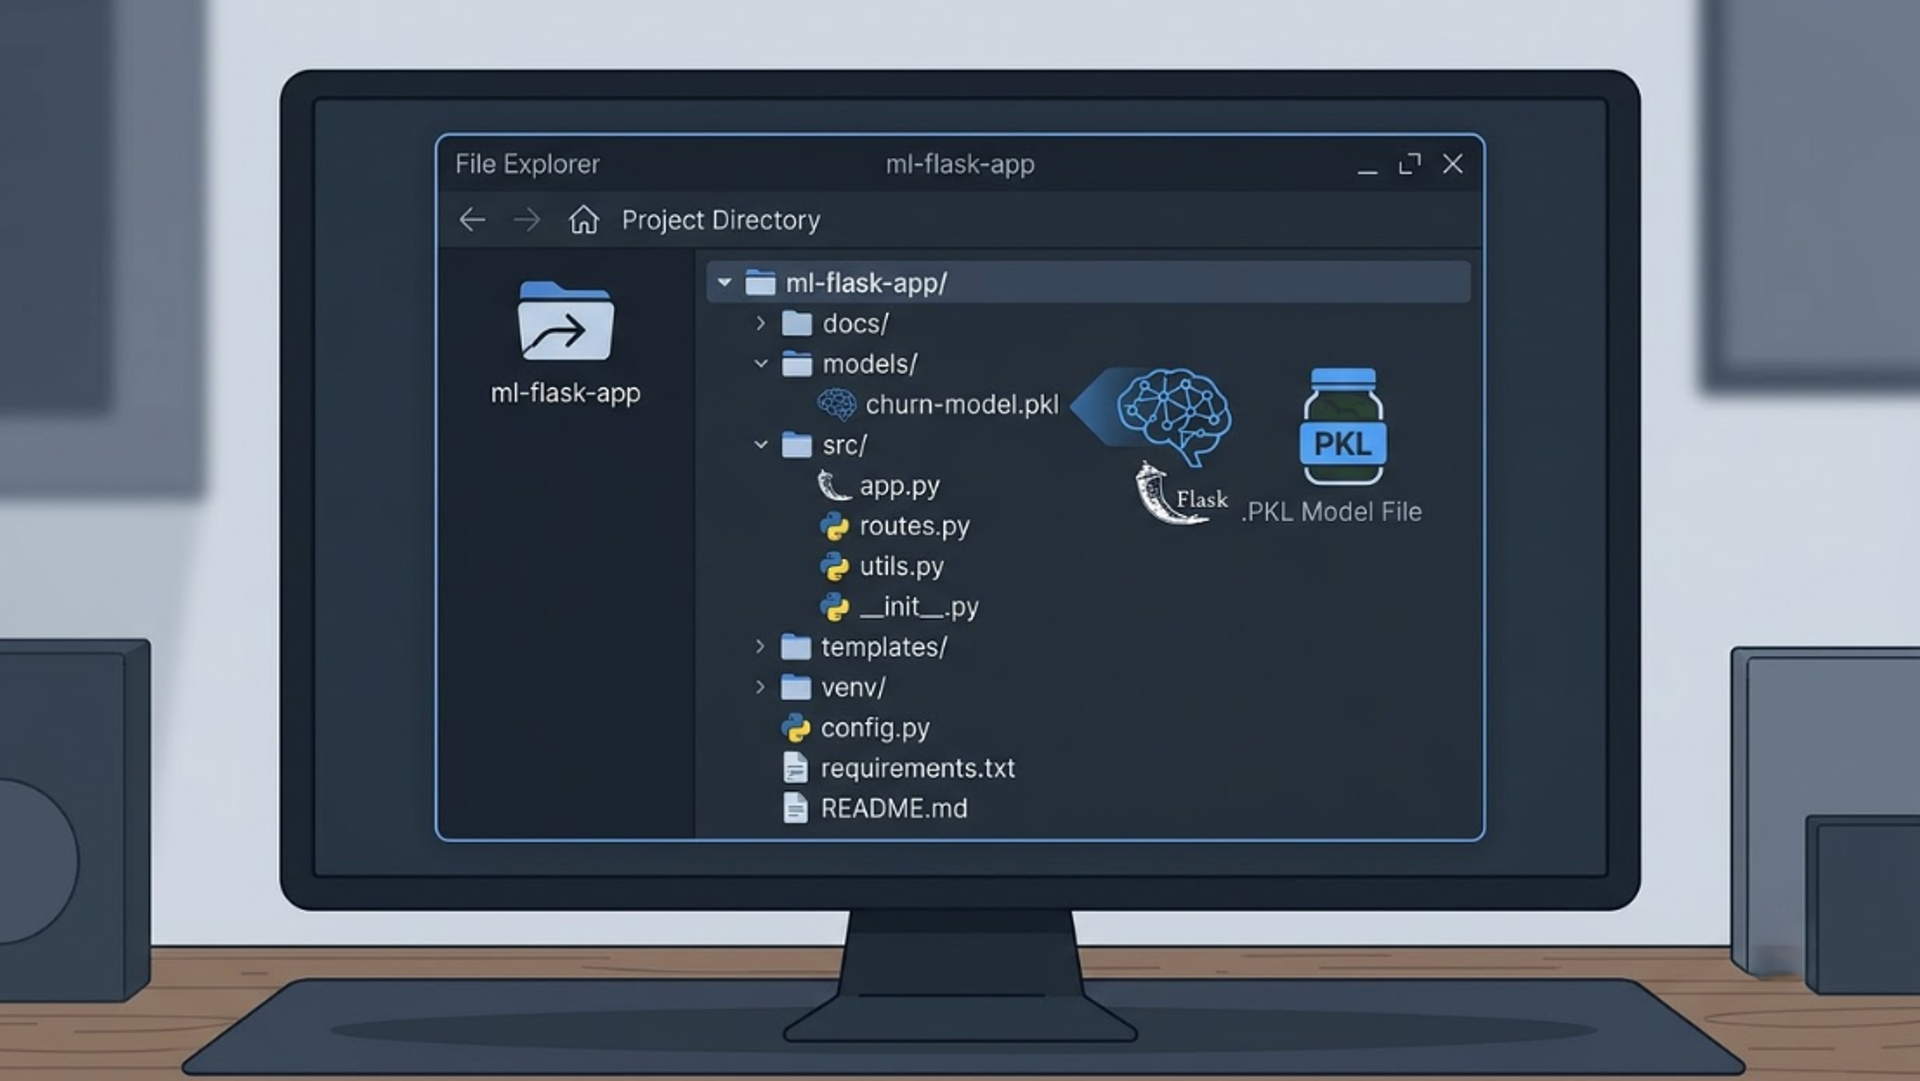
Step 3 - Create a Flask Project
Organization is vital when creating a Flask API for machine learning. Create a new folder for your project with the following beginner-friendly structure:
Step 4 - Install Flask and Required Libraries
Open your terminal, navigate to your project folder, and create a virtual environment to keep your dependencies organized.
Pro-tip: Save your environment details by running pip freeze > requirements.txt.
Step 5 - Load the Machine Learning Model
Now, let's write our Flask application. Open app.py and start by loading the saved model.
Loading the model at the top of the file ensures it loads into memory exactly once when the server starts, rather than reloading it every single time a user requests a prediction (which would be very slow).
Step 6 - Create a Prediction Endpoint
Next, we create the route (or API endpoint) that users will interact with. Add this to app.py:
Let’s explain what happens here:
@app.route('/predict', methods=['POST']): This tells Flask to listen for data sent tohttp://localhost:5000/predict. We usePOSTbecause the user is "posting" input data to our server.request.get_json(): Converts the incoming web data into a Python dictionary.jsonify(): Converts our Python dictionary response back into JSON format so web browsers and apps can read it.
Step 7 - Run the Flask Application
In your terminal (with your virtual environment activated), start the server:
You should see output indicating that Flask is running on [http://127.0.0.1:5000](http://127.0.0.1:5000).
Step 8 - Test the Prediction API
Because our endpoint requires a POST request, you cannot just type the URL into your browser. Instead, you can use a tool like Postman, or write a simple Python script to test it.
Create a file called test_api.py and run it:
Expected Output: {'predicted_price': 358500.0, 'status': 'success'}
Congratulations! You have successfully mastered step-by-step machine learning model deployment with Flask.
Common Errors When Deploying ML Models with Flask
Beginners often encounter a few frustrating bumps along the way. Here is how to troubleshoot them:
- ModuleNotFoundError:
- Why it happens: You forgot to install a library (like
scikit-learn) in your virtual environment. - How to fix it: Run
pip install <library_name>.
- Why it happens: You forgot to install a library (like
- Model File Not Found (FileNotFoundError):
- Why it happens: Flask cannot locate
house_model.pkl. - How to fix it: Ensure you are running
python app.pyfrom the exact folder where the.pklfile lives.
- Why it happens: Flask cannot locate
- Incorrect Input Format / Feature Name Mismatch:
- Why it happens: If you trained your model using columns named
['Bedrooms', 'Square_Feet'], but send['bedrooms', 'sqft']in your JSON, scikit-learn will throw an error. - How to fix it: Ensure the feature names and order in your Flask
predict()function match your training data perfectly.
- Why it happens: If you trained your model using columns named
- Port Already in Use:
- Why it happens: Another application is using port 5000.
- How to fix it: Change the port in your app:
app.run(port=5001).
Best Practices for Flask Machine Learning Deployment
To take your skills from a beginner level to what is expected in an advanced data science and AI master program, follow these best practices:
- Use Virtual Environments: Never install project libraries globally on your computer.
- Maintain requirements.txt: Always keep an updated list of your project dependencies so others can reproduce your environment.
- Validate Input Data: Do not trust user input. If someone types "Three" instead of the number
3for bedrooms, your API will crash. Add code to check data types before predicting. - Keep Preprocessing Consistent: If you scaled or normalized your data during training, you must apply the exact same scaling to the incoming user data in Flask before passing it to the model.
- Hide Sensitive Information: Never hardcode passwords or API keys in your
app.py. Use environment variables.
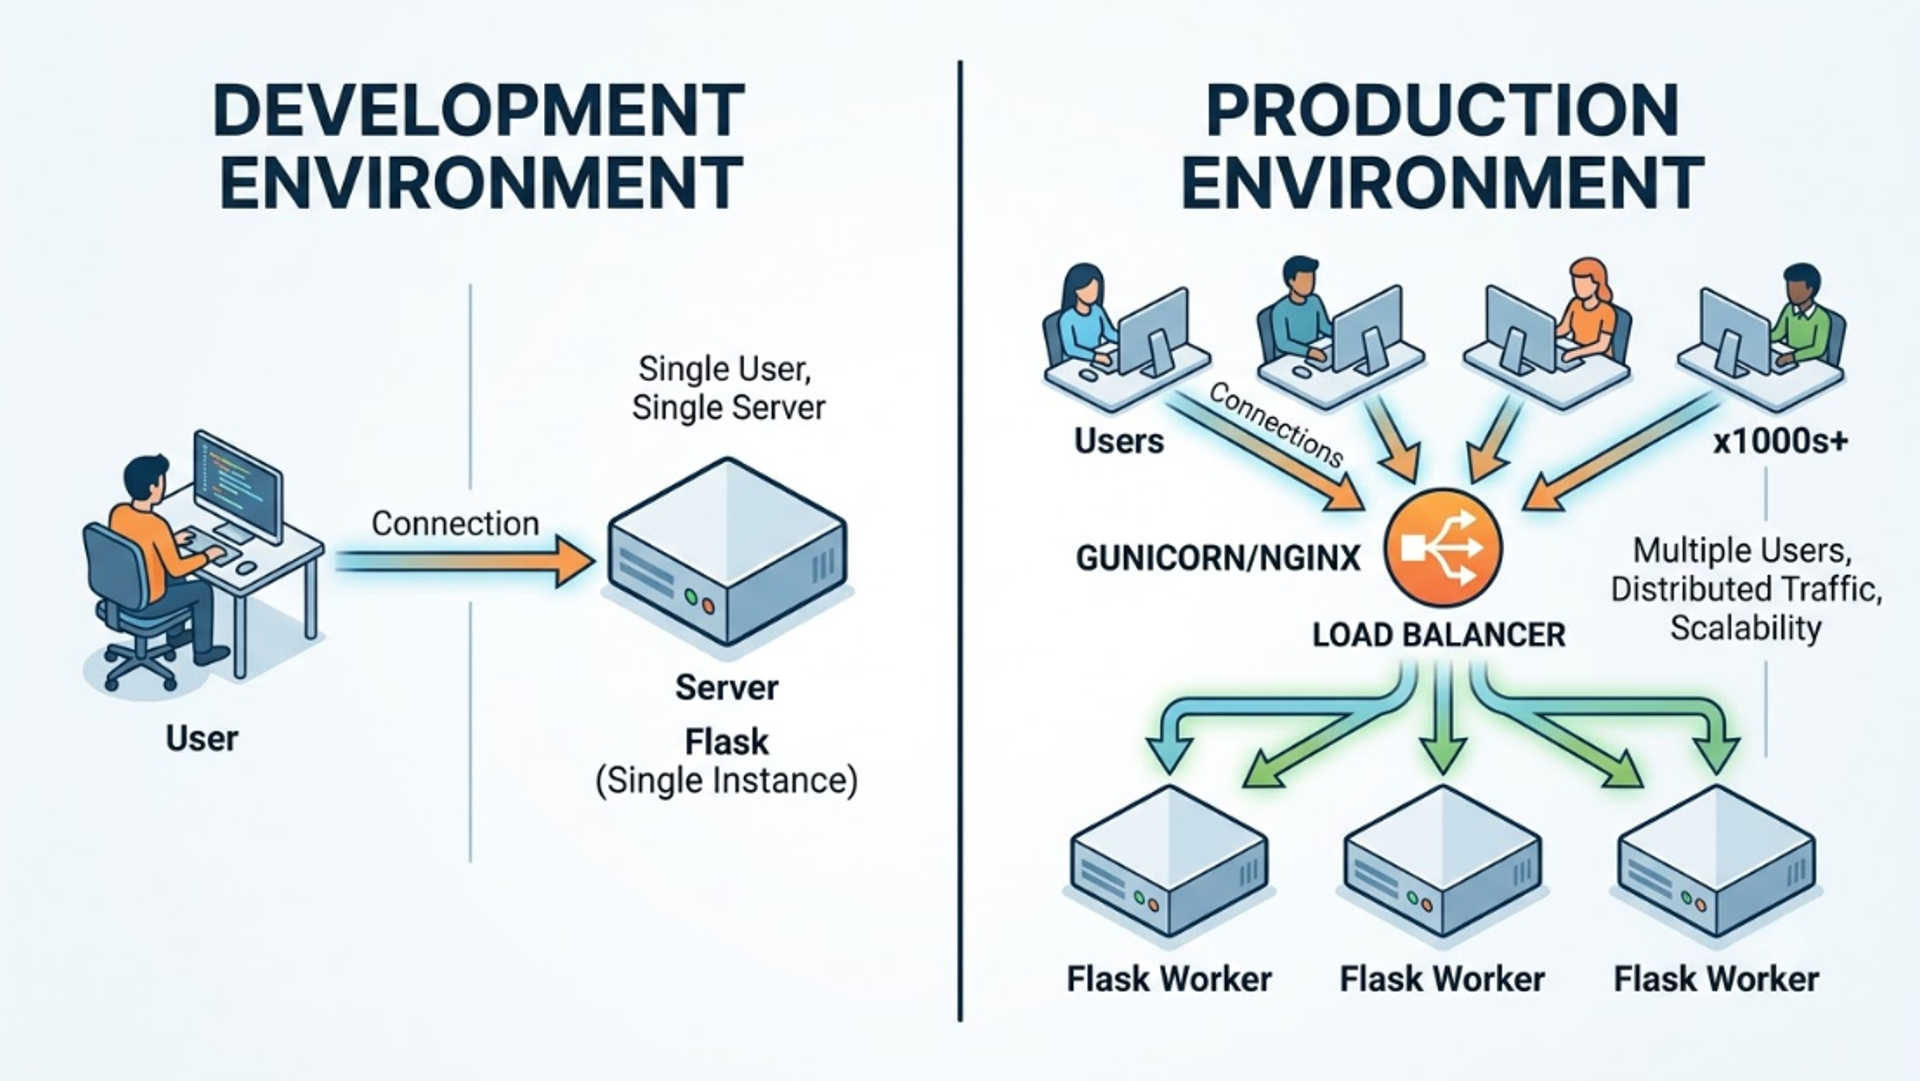
Flask for Development vs Production
There is a critical warning you will see in your terminal when you run Flask: “WARNING: This is a development server. Do not use it in a production deployment.”
Why? The built-in Flask development server is designed to handle only one request at a time. If 100 users try to get a prediction simultaneously, your Flask app will crash or freeze.
When you deploy a Python machine learning model to a live, production environment (like AWS or Heroku), you should pair Flask with a robust WSGI server like Gunicorn. Gunicorn creates multiple "workers" (copies of your Flask app) so it can handle many users at the same time.
Advantages and Limitations of Flask for ML Deployment
Flask is fantastic, but it isn't perfect for every single scenario.
Advantages:
- Simplicity: Extremely easy to learn and write.
- Flexibility: You have total control over how your API handles logic.
- Ecosystem: Since it’s Python, you can natively load machine learning with Python libraries.
Limitations:
- Scaling: Managing heavy traffic requires additional tools (Gunicorn, Docker, Nginx).
- Asynchronous Tasks: Flask is traditionally synchronous. If a deep learning model takes 10 seconds to predict, it blocks other users from accessing the API during those 10 seconds.
- Security: Out-of-the-box Flask requires manual configuration for advanced security measures.
Flask vs Other ML Deployment Options
How does Flask stack up against alternative frameworks?
If you want to dive deeper into object-oriented setups used in complex frameworks, review understanding Python OOP concepts.
Real-World Applications of Flask-Based ML APIs
Deploying ML models with Flask is not just for practice. Real-world companies use similar API architectures to power:
- Healthcare Prediction Systems: APIs that accept patient vitals and return disease risk probabilities.
- Fraud Detection: Banking systems that send transaction details to a Flask backend to instantly predict if a purchase is fraudulent.
- Customer Churn Prediction: Marketing dashboards that fetch predictions on whether a user is likely to cancel their subscription. (Concepts heavily utilized in digital marketing analytics).
(Note: Production healthcare or financial applications require extreme compliance, security, and infrastructure far beyond a basic Flask setup.)
Frequently Asked Questions
What is model deployment with Flask?
It is the process of wrapping a trained machine learning model inside a Flask web server, allowing users or other software to interact with the model via internet requests (APIs) to get predictions.
Why is Flask used for machine learning deployment?
Flask is written in Python, making it 100% compatible with popular ML libraries like scikit-learn and pandas. It is lightweight, requires very little boilerplate code, and makes building REST APIs incredibly simple for beginners.
How do I deploy a machine learning model using Flask?
First, train and save your model using joblib. Next, create a Flask script (app.py) that loads the model. Finally, create a route (like /predict) that accepts incoming JSON data, passes it to the model, and returns the prediction as a JSON response.
Is Flask suitable for production ML deployment?
Flask is suitable for small to medium production workloads provided it is served using a production-grade WSGI server like Gunicorn, often placed behind a reverse proxy like Nginx or deployed inside Docker containers.
Is Flask better than FastAPI for ML?
Flask is easier for absolute beginners to grasp. However, FastAPI is generally preferred for modern, high-performance production ML deployment because it is natively asynchronous and automatically generates API documentation.
What is the difference between model training and model deployment?
Model training is the historical process of teaching an algorithm to recognize patterns in existing data. Model deployment is taking that finalized algorithm and making it available in real-time to make predictions on new, unseen data. (Learn more about these phases by exploring the differences between machine learning vs artificial intelligence).
Conclusion
Understanding model deployment with Flask is a massive milestone for any data science student. By bridging the gap between your Jupyter Notebooks and the real world, you transform static algorithms into interactive, valuable software solutions.
You have learned what deployment is, why Flask is uniquely suited for Python developers, and exactly how to build, test, and troubleshoot your first prediction API.
The next step is to continue building! Expand your API to handle complex preprocessing, explore cloud deployment platforms like Heroku or AWS, and start incorporating these deployed APIs into your portfolio.
Ready to take your data science career to the next level? Explore comprehensive, hands-on training with Cinute Digital. Check out our industry-aligned educational resources today, and turn your foundational knowledge into a high-paying tech career!
Tags

A visionary data scientist dedicated to unlocking the potential of data to drive informed decision-making and spark innovation. With a strong foundation in Data Science.